
You noticed it on a sunny morning — a cluster of bumps and raised patches on your window tint that definitely weren’t there when it was first installed. Or maybe you’ve watched it get progressively worse over the past few months, spreading from a small area near the edge to covering most of the glass.
Bubbling window tint is one of the most common window film problems Massachusetts drivers deal with — and one of the most misunderstood. The good news is it’s completely fixable. The bad news is the fix is almost never what you want it to be: once tint starts bubbling from adhesive failure, there’s no patch, no DIY trick, and no shortcut. The film has to come off.
Here’s exactly why it happens, whether your specific situation is fixable, and what to do next.
Is Some Bubbling Normal Right After Installation?
Yes — with an important distinction.
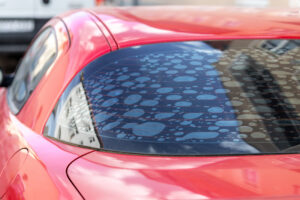
When window tint is freshly installed, a small amount of water and air gets trapped beneath the film during the application process. This creates tiny water bubbles or a slightly hazy appearance that’s completely normal in the first few days after installation. As the adhesive cures and the moisture evaporates, these bubbles disappear on their own — typically within 3 to 7 days depending on temperature and humidity.
What’s normal: Small, soft, water-filled bubbles in the first week after installation that gradually shrink and disappear.
What’s not normal: Large, hard, air-filled bubbles. Bubbles that appear or grow weeks or months after installation. Bubbles that don’t shrink over time. Bubbles accompanied by purple discoloration or peeling edges.
If your tint has been installed for more than 2 weeks and you’re still seeing bubbles — or new bubbles are appearing — something has gone wrong. Here’s what causes it.
The 4 Main Reasons Window Tint Bubbles
1. Cheap or Low-Quality Film
This is the most common cause of bubbling tint — and the one most people don’t find out about until it’s too late.
Window tint film is not all the same. At the lower end of the market, manufacturers use dye-based films with inexpensive adhesive systems that aren’t engineered for long-term UV and heat resistance. These films look fine when first installed. The problem develops over the following months and years as Massachusetts summers expose them to sustained heat and UV radiation.
Here’s the chemistry of what happens: the dye in cheap tint film absorbs UV radiation. Over time, that UV absorption breaks down the adhesive layer beneath the film. As the adhesive degrades, it releases gas — and those gas pockets are your bubbles. This process is called off-gassing, and once it starts, it doesn’t stop.
Inexpensive dyed films typically start showing this kind of failure within 2 to 5 years. Premium dyed films last somewhat longer. Professional-grade ceramic films — which don’t use dye and don’t absorb UV the same way — are dramatically more resistant to this type of failure and can last the life of the vehicle.
The tell: Bubbling that’s widespread across the entire window, often accompanied by a purple or brownish color shift in the film, is almost always cheap dyed film in the final stages of failure.
2. Poor Installation
Even quality film will bubble if it’s not installed correctly. Installation errors that cause bubbling include:
Contaminated glass. If the window wasn’t thoroughly cleaned before the film was applied, dust, oils, or debris trapped under the film prevent the adhesive from bonding properly to the glass. Those contamination points become bubble initiation sites — small areas where the bond fails first, and from which bubbles spread.
Trapped moisture or air. During installation, the film is applied with a solution that allows it to be positioned before the adhesive fully bonds. An experienced installer uses a squeegee to work all moisture and air bubbles out from under the film before it sets. If this step is rushed or done improperly, moisture or air pockets remain and the film never fully bonds to the glass in those areas.
Improper edge sealing. The film must be precisely cut and sealed at the edges. If edges are left exposed, lifted, or not properly sealed against the window frame, moisture works its way in from the edges — causing bubbles to start at the perimeter and spread inward over time.
Inexperienced application on curved glass. Modern vehicles have significantly curved rear windows and increasingly curved side glass. Applying flat film to a curved surface without the right technique — heating the film to conform to the curve and carefully relieving stress points — leaves areas where the film is under tension and not fully bonded. These tension points are prime bubble locations.
The tell: Bubbles concentrated along the edges of the tint, or appearing within the first few months of installation, are typically installation-related rather than film quality related.
3. UV and Heat Degradation Over Time
All window tint has a service life, and heat and UV exposure are what ultimately end it. Massachusetts summers — while not as extreme as southern states — deliver consistent UV radiation and high temperatures that gradually break down tint adhesive over time, particularly on:
South and west-facing windows. The driver’s side window on a car parked facing east gets afternoon western sun — often the hottest and most intense of the day. Tint on that side frequently shows earlier failure than the passenger side.
The rear window. The rear window on many vehicles is nearly horizontal at certain angles and receives intense direct sun. Combined with the defroster lines running through it — which generate their own heat — the rear window is often where bubbling starts first.
Dark-colored vehicles. Black, dark blue, and dark grey vehicles absorb significantly more heat than lighter-colored cars. Interior temperatures on dark vehicles regularly exceed 150°F on hot summer days. That sustained heat accelerates adhesive breakdown dramatically.
The tell: Bubbling that started after several years of normal use, concentrated on the sunnier windows of the vehicle, is typically UV and heat degradation — the natural end-of-life for the film.
4. Improper Care After Installation
Certain maintenance habits accelerate tint failure:
Ammonia-based glass cleaners. Windex and many other common glass cleaners contain ammonia. Ammonia degrades window tint adhesive and the scratch-resistant coating on the film surface. Even a small amount of ammonia-based cleaner getting behind the film edge can accelerate failure significantly. Always use ammonia-free cleaners on tinted windows.
Rolling windows down too soon after installation. Rolling the window down before the tint has fully cured — typically 3 to 7 days after installation — can peel the film away from the glass before the adhesive has properly set, creating lifting at the edges that turns into bubbling.
Abrasive cleaning materials. Paper towels, rough cloths, and abrasive pads scratch the film surface and degrade the protective coating over time, allowing moisture and UV to penetrate more easily.
The tell: Bubbles concentrated along the lower edge of the window — where the film meets the door seal when the window rolls down — are often caused by rolling the window down too soon. Bubbles spreading from the edges inward can be related to chemical damage from wrong cleaning products.
Can Bubbling Window Tint Be Fixed Without Replacing It?
This is the question everyone asks — and the honest answer is almost always no.
For water bubbles in the first week: These resolve on their own as the adhesive cures. No intervention needed or recommended.
For air bubbles from installation error caught very early: An experienced installer may be able to carefully lift a section of film, release the trapped air, and re-apply before the adhesive fully sets. This only works in a narrow window shortly after installation — not weeks or months later.
For bubbles caused by adhesive failure: No. Once the adhesive has degraded and begun off-gassing, the film cannot be re-bonded to the glass. Puncturing the bubbles with a needle — a commonly suggested DIY “fix” — doesn’t work because the adhesive is no longer capable of holding the film flat. The air comes straight back. Worse, the holes you’ve made now allow moisture and dirt to get under the film, accelerating further failure and making eventual removal more difficult.
For widespread bubbling with purple discoloration: The film is in terminal failure. No repair is possible. The only solution is full removal and replacement.
The bottom line: if your tint is bubbling from adhesive failure, it needs to come off. The question is just how soon and what goes back on.
Why Professional Tint Removal Matters
Removing failed window tint sounds simple — peel it off, done. In practice, it’s one of the trickier parts of the whole process, particularly on rear windows.
Your rear window has defroster lines — thin conductive strips embedded in or printed on the glass that heat the window to clear frost and fog. Window tint adhesive bonds directly to these lines. If the film is ripped off rather than carefully removed using controlled heat to release the adhesive bond, those defroster lines can be torn away with the film. Once defroster lines are damaged, the rear defroster no longer works — and rear window replacement is expensive.
Professional removal uses heat application and proper technique to gradually release the adhesive bond, protecting the defroster lines throughout the process. After the film is removed, adhesive residue is cleaned from the glass using appropriate products that won’t scratch or cloud it.
At Massachusetts Car Detailing in Rockland, MA, we perform professional tint removal for exactly this reason — protecting the glass and defroster lines during removal so you’re starting with a clean, undamaged surface for the new film.
What to Put Back On: Upgrade to Ceramic Tint
If you’re going through the process of removing failed tint, it’s worth thinking carefully about what goes back on. The same cheap dyed film that just failed after 3 years will fail again in another 3 years. The economics of repeatedly replacing low-quality tint don’t make sense.
Ceramic window tint is the professional-grade alternative that addresses the root cause of dyed film failure. Here’s the key difference:
Dyed film absorbs UV radiation. That UV absorption is what breaks down the dye and the adhesive over time — the off-gassing and bubbling you’re dealing with now.
Ceramic film uses nano-ceramic particles rather than dye. Ceramic doesn’t absorb UV — it reflects it. Without the UV absorption mechanism, the primary cause of adhesive failure is removed. Professional ceramic tint doesn’t purple, doesn’t bubble from dye breakdown, and is warranted to last the life of the vehicle when professionally installed.
Ceramic tint also outperforms dyed film in heat rejection, UV protection, and clarity. It’s more expensive upfront — but when you factor in the cost of removal and reinstallation every few years with cheap film versus a single professional ceramic installation, ceramic is the better value over a 5–10 year ownership period.
Window Tint Removal and Retinting at Massachusetts Car Detailing
We serve Rockland and the entire South Shore including Weymouth, Hingham, Norwell, Hanover, Braintree, Scituate, Marshfield, and surrounding communities. Whether you need removal only, removal plus ceramic retint, or just a professional assessment of whether your current tint is worth saving, we’re here to help.
320 Centre Ave, Rockland, MA (781) 347-5321 Open 7 days a week, 7AM–7PM
Book your tint removal or retint appointment today →
Frequently Asked Questions
My tint just got installed last week and it has bubbles — is something wrong? Small water bubbles in the first 3–7 days after installation are completely normal and will resolve on their own as the adhesive cures. Don’t roll your windows down, wash the car, or try to press the bubbles out — just give it time. If the bubbles haven’t resolved after 2 weeks, contact the installer.
My tint is turning purple and bubbling — are these related? Yes — they’re both symptoms of the same underlying cause. Cheap dyed film absorbs UV until the dye molecules break down. The color shift to purple happens as the blue and yellow pigments degrade. The bubbling happens as the same UV damage breaks down the adhesive. Both indicate the film has reached end of life and needs to be replaced.
Can I pop the bubbles with a needle to fix them? We strongly advise against this. It provides temporary relief at best — the air comes straight back because the adhesive is no longer capable of holding the film flat. The holes also allow moisture and dirt under the film, making future removal harder and the film look worse in the meantime.
Will bubbling tint fail my Massachusetts state inspection? Bubbling tint may draw scrutiny during a state inspection, and severely bubbled or peeling tint that significantly impairs visibility can result in a failed inspection. More practically, bubbling tint that has also darkened beyond the legal 35% VLT limit — which often happens as dyed film ages — will fail inspection for the tint darkness alone.
How long does tint removal take? Most vehicles take 1–2 hours for professional removal. Rear windows with significant adhesive buildup from heavily failed film take more time. We’ll give you a specific estimate when you book.
How much does it cost to remove and retint windows in Massachusetts? Pricing depends on the number of windows, the condition of the existing film, and the type of new film chosen. Call us at (781) 347-5321 for a quick quote — combining removal and retinting in one appointment is the most efficient and cost-effective approach.